Starting out in Punch Needle
What is Punch Needle? Everything you need to know about the embroidery technique of the moment!
Punch needling is the latest, thrilling and fashionable form of embroidery that suits all skill levels. It allows you to create daring accessories and stunning home décor projects! In a few short years, punch needle has exploded in popularity, mostly thanks to social media. Here we explain how to start your first punch needle project.

What is needle punching?
A straightforward technique for raised embroidery, punch needle uses a tool known as a "magic needle" to punch loops of thread into fabric. By combining different colours of wool yarns, you can achieve a range of unexpected and fun results. It's a quick and easy process to experiment with, allowing you to make items for your home like cushions, wall art, or trendy accessories. Punch needle embroidery has been reimagined in recent years and has become the perfect activity for those who enjoy therapeutic hobbies.
Before we delve into the different stages of punch needle embroidery, let's learn a bit about its history... Punch needle has been around since medieval times, and it might even date back to ancient Egypt. The technique was used to decorate religious garments and to make rugs during long sea voyages. Punch needle is said to have originated in Russia before reaching the United States in the 18th century.
Starting punch needle embroidery
Needle Punch is a simple and straightforward activity, perfect for beginners. It helps to build self-confidence and is an ideal playful activity in art therapy to learn to let go and relax. Punch needle allows for a variety of projects in hobbies and home décor, making it perfect for gift ideas.
Everything you need to punch needle

To create raised embroidery with punch needle, you will require specific materials. For this reason, the Figured'Art punch needle kit for beginners and enthusiasts includes :
- A 26cm x 26cm pre-printed linen canvas
- Quality wool yarns: we make sure that in each kit, a sufficient quantity of wool is offered
- A punch needle tool
- A 20cm diameter embroidery hoop
- A metallic or nylon needle threader
- A punch needle tutorial to help you make your embroidery
We have selected a variety of designs suited to each individual's taste and preferences: landscapes, characters, animals... The choices are endless! Punch needling requires some practice to get the hang of it, but once you have found the right movements and rhythm, you'll achieve the desired results quickly and precisely.
HOW TO PUNCH NEEDLE? : BEGINNERS' GUIDE
If you're new to punch needle, here are the steps to learn this technique:
Preparing the canvas:
Before you begin punching, you need to stretch your canvas in the punch needle frame. Follow these steps to prepare your canvas:
Loosen the embroidery hoop by turning the screw counterclockwise

Place the canvas on the inner ring of the frame, and then lock it with the other part of the frame.

Adjust the position of the fabric and tighten it.

Tighten the frame screw, your canvas is ready to be used!
Threading your needle
To start punching, you need to thread your punch needle. Here's how to do it:

Pass the needle threader through the stem of the punch needle until the end of the handle.

On the handle side, pass the yarn through the loop of the needle threader.

Remove the needle threader from the stem side to thread the yarn through the punch needle.

Now pass the needle threader through the eye of the needle.

Then pull to bring the yarn out and adjust the length of the yarn that is coming out (7-8 cm). It should not be too short so that your yarn does not escape from the needle, nor too long as it will get in your way when you start embroidering.
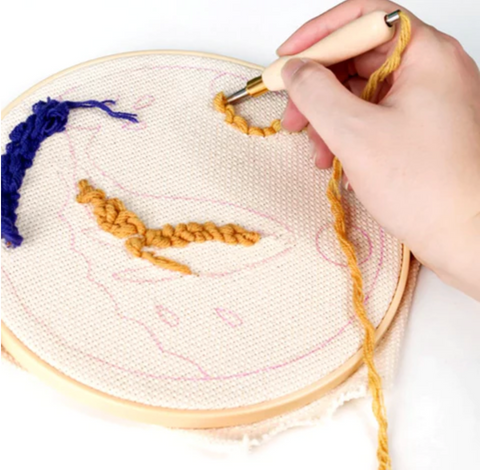
Now Punch!
It's time to get serious and start punching! Hold your frame in one hand and your needle in the other.

Insert the needle completely into the canvas.

Hold the punch needle so that the yarn is positioned at the bottom of the needle. Insert the needle, push it all the way in, and remove it without lifting it off the fabric. Keep the needle as close to the canvas as possible to avoid the thread from escaping. By sliding the needle, you can stick the next point and let the tension of the fabric keep the points in place. Complete the outline of the area before filling the inside, trying to keep the same gaps between two points. Repeat these steps until your canvas is finished. The yarn should be loose at the skein level.

Continue the pattern with the same colour and cut the yarn on the back.
Congratulations, you have created your first raised stitches! The front side will have smooth points, and the back side will have loops. For more experienced punchers, try alternating embroidery on the front and back of the canvas for different effects. To create big loops on the front of the canvas, stick the points on the back. For smooth points, stick them on the front. These two techniques allow you to create contrast and add volume to your work.
Finally, add textile glue to the back of your work to keep everything in place.
Good to know
- Remember to keep the oblique side of the needle turned towards your next point and to slide the needle horizontally, from right to left if you are right-handed and vice versa for left-handers. Remove the needle delicately to avoid undoing your point.
- Change the direction to punch, it is not the needle that should pivot but the frame!
- Start with small surfaces and finish with larger surfaces.
- Stitch length: If the surface you are punching is less than 5cm, you will need to leave at least 2 to 3 holes between each punch. For a slightly larger punching surface, leave at least 3 to 4 holes between each punch, and for a larger surface such as a background, leave 4 holes or more between each punch.
- If the yarn becomes looser over time, simply pull the yarn from the back of the punch needle and start again.
I made a mistake while punching, what should I do?
If you are unhappy with your stitches, what should you do? It's possible that you may not be satisfied with your initial attempts at punch needle. But don't worry, all you need to do is lift your needle and gently pull the yarn to undo your last stitches. To erase the holes created by previous stitches, simply scrape the canvas with the tip of the needle. If you run out of wool for a colour, you may have punched too tightly, in which case feel free to undo and start again, leaving larger spaces between 2 stitches.
Once you're finished, you can proudly display your work at home or, if you enjoy sewing, use it to make cushions or other accessories. Trust us, once you start, you won't want to stop!