How to do diamond painting
How to do Diamond Painting: A Step-by-Step guide to making a Sparkling Work of art
 Are you ready to dive into the sparkling world of diamond painting? If you're new to this addictive hobby, don't worry - we've got you covered and show you how to do diamond painting with step-by-step instructions that will guide you through the process of creating your very own masterpiece.
Diamond painting is a unique blend of paint-by-numbers and cross stitch, where you use small diamonds to create a dazzling work of art on an adhesive canvas. Not only is it easy to learn, but it also produces stunning results quickly, making it the perfect introduction to the world of needlework for beginners.
But don't be fooled by its simplicity - there are plenty of challenges for advanced diamond painters, including larger and more complex designs, as well as the option to create your own unique artwork from a photo.
And the benefits of diamond painting are numerous! It's a great way to relieve stress, boost your creativity, and spend quality time alone or with loved ones.

So, let's get started! All you need is patience, attention to detail, and our easy-to-follow instructions to show you how to do diamond painting and create your very own sparkling masterpiece. Get ready to be dazzled by the world of diamond painting!
STEP 1: Get your kit and your diamond painting tools
Are you eager to start your diamond painting journey? The first step is to get your hands on a diamond painting kit, which includes all the necessary tools to create your sparkling masterpiece. At Figured'Art, we offer a range of diamond painting kits in different sizes and designs, each containing an adhesive canvas, drills, a diamond painting pen, a wax pad, and a tray.
But why stop there? Check out our blog article on diamond painting accessories to discover additional tools that can enhance your experience, such as a light pad or storage container.
Once you've got your kit, it's time to prepare your workspace. Find a clean, flat surface with ample lighting, so you can see those tiny diamonds clearly. If you're working on a larger canvas, a light pad can make the process even easier.
Step 2: Prep Your Workspace
Are you ready to get your creative juices flowing? Before you start your diamond painting project, it's important to prep your workspace to ensure a smooth and enjoyable experience.
First, find a clean and flat surface to work on, and lay out all your supplies. This will help you stay organised and prevent any accidental spills or misplacements.
Next, lighting is key! You want to be able to see those tiny diamonds clearly, so make sure you have good lighting. If you're working on a larger canvas, consider using a light pad underneath to illuminate your work even further.
By taking the time to prepare your workspace, you'll be able to fully immerse yourself in the diamond painting process and let your creativity shine. So, let's get ready to create a dazzling masterpiece!
Step 3: Look at the legend on the side of the canvas

Ready to start adding some sparkle to your canvas? The next step is to consult the legend located on the side of your adhesive canvas.
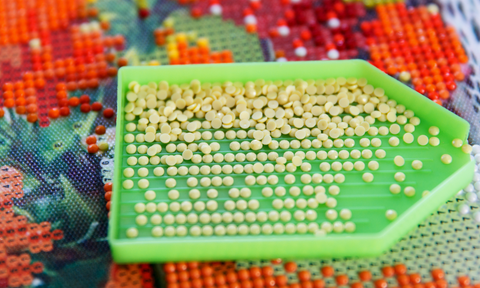
The pattern on the canvas is made up of symbols, each corresponding to a specific diamond colour. To begin, identify which colour to start with and locate the corresponding diamond bag. For ease and organisation, we suggest opening one bead bag at a time and placing them in the small plastic bag included in your kit. Be sure to label each bag with the corresponding colour number for easy reference.
Now it's time to get down to business! Pour a small quantity of diamonds into your tray, making sure they are not overlapping and are facing upwards. This will allow for easy access to each diamond as you work on your masterpiece.
By following these simple steps, you'll be well on your way to creating a stunning diamond painting that will sparkle and shine. So go ahead, grab your tools, and let your creativity take over!
Step 4: Apply the Diamonds
It's time to add some sparkle to your canvas! Are you ready to get started? Here's how to apply the diamonds to your diamond painting.
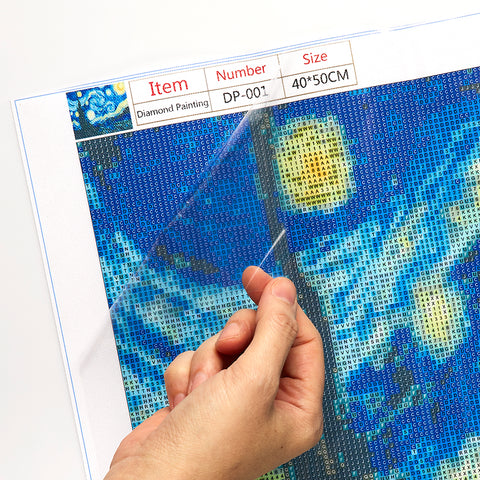
Begin by peeling back a small section of the protective film on the canvas. Then, take your diamond pen and dip it into the wax pad, picking up a diamond from the tray. Always pick up the diamond on the relief side of the bead to ensure it adheres properly.

Using the diamond painting pen applicator tool, gently press the diamond down onto the corresponding symbol on the canvas. Continue this process until you've filled in the entire section. If you're working with multiple colours, be sure to work in small sections and finish one colour before moving on to the next. This will help ensure that you don't accidentally mix up the colours and maintain the integrity of your masterpiece.

With these easy-to-follow steps, you'll soon find yourself lost in the process of diamond painting and creating a dazzling work of art. So go ahead, unleash your inner artist, and watch your masterpiece come to life!
Step 5: Speed up the process
If you're feeling adventurous and want to speed up the diamond painting process, you can use the multiple tip tool! This nifty tool allows you to pick up multiple diamonds at once and apply them to the canvas much faster than with the traditional single-tip applicator. It not only saves you time, but it also helps to align the diamonds correctly, resulting in a more polished finish. Simply dip the multiple tip tool into the wax, pick up the aligned diamonds from the tray, and place them on the corresponding symbols on the canvas. Repeat until the section is complete, and you'll be amazed at how quickly your masterpiece comes together!
Step 6: Finishing Touches
You've applied all of the diamonds and your artwork is beginning to take shape! But before you can show it off to the world, there's one more important step to take. Using a rolling pin or flat surface, gently press down on the completed sections to secure the diamonds firmly in place. This will not only make sure that your masterpiece stays intact, but also add a satisfying finishing touch to your sparkling creation.
Step 7: Framing Your Diamond Painting
Congratulations on completing your dazzling diamond painting masterpiece! You can now display your artwork as is or give it a polished look by framing it. With your newfound diamond painting skills, you can impress everyone who admires your stunning creation!
Diamond painting is a delightful and fulfilling craft that is suitable for everyone. By following our guide on how to do diamond painting, you created a stunning masterpiece that sparkles with beauty. So, don't wait any longer, grab a new diamond painting kit and start creating another work of art today!